Introduction
Italian cuisine is renowned for its rich flavors, comforting aromas, and warm hospitality. Among the many delightful offerings, garlic knots hold a special place in the hearts of many. These delectable morsels are not just a side dish but an integral part of the Italian dining experience, often served warm alongside pasta dishes or as an appetizer. Their irresistible combination of buttery garlic goodness and a hint of herbs makes them a favorite in pizzerias and Italian restaurants alike.
While store-bought garlic knots can satisfy a craving, there is something truly magical about homemade bread. Preparing your own Italian Herb Garlic Knots allows you to control the flavors and ingredients, ensuring a fresh and authentic experience. The warm aroma of baking bread fills your kitchen, creating an inviting atmosphere that draws family and friends together. Whether you’re preparing for a family dinner, hosting a gathering, or simply indulging in a culinary adventure, this easy guide will walk you through the steps to create flavorful Italian Herb Garlic Knots right in your own kitchen.
Understanding the Ingredients
To create the perfect Italian Herb Garlic Knots, it’s essential to understand the role of each ingredient in the recipe. Here’s a breakdown of what you’ll need:
All-Purpose Flour
All-purpose flour serves as the foundation of the dough, giving it structure and texture. The protein content in the flour is crucial for gluten development, which gives the knots their chewy yet tender texture. Using high-quality all-purpose flour will result in a better rise and a fluffier bite, ensuring that your garlic knots are both light and satisfying.
Instant Yeast
Unlike traditional yeast, instant yeast (also known as rapid-rise or quick-rising yeast) is designed to activate immediately when mixed with dry ingredients. This quick-acting nature not only speeds up the dough-making process but also makes it easier for home bakers to achieve successful results without extensive proofing times. Instant yeast doesn’t require prior activation in warm water, saving you time and effort in the kitchen while delivering consistent results.
Sugar and Salt
Sugar plays a dual role in this recipe. It not only enhances the flavor of the knots but also acts as food for the yeast, promoting fermentation and helping the dough to rise. Meanwhile, salt is vital for flavor enhancement and is essential for regulating yeast activity. Too much salt can inhibit yeast growth, while too little can lead to bland bread. The balance of sugar and salt is key to achieving the perfect flavor profile in your garlic knots.
Warm Water
The temperature of the water used in making the dough is crucial for successful yeast activation. Warm water (around 100°F to 110°F) creates an ideal environment for the yeast to thrive, ensuring that the fermentation process begins effectively. It’s important to avoid water that is too hot, as this can kill the yeast and prevent your dough from rising.
Olive Oil
Olive oil is not just a flavorful addition; it also contributes to the moisture and richness of the dough. The fat in olive oil helps create a tender crumb while adding a subtle flavor that complements the garlic and herbs. Using high-quality extra virgin olive oil can elevate the taste of your garlic knots, making them even more irresistible.
Garlic and Herbs
The star ingredients that truly define Italian Herb Garlic Knots are, of course, the garlic and herbs. Freshly minced garlic infuses the knots with a robust flavor, while a blend of Italian herbs, such as oregano, basil, and parsley, adds depth and aromatic appeal. This combination creates a mouthwatering aroma that will leave your guests eagerly anticipating the first bite.
Optional Ingredients
For those looking to elevate their garlic knots even further, consider adding red pepper flakes for a touch of heat or grated Parmesan cheese for a savory richness. These optional ingredients can be mixed into the dough or sprinkled on top of the knots before baking, providing an added layer of flavor that complements the garlic and herbs beautifully.
Step-by-Step Guide to Making Italian Herb Garlic Knots
Now that you have a clear understanding of the ingredients and their roles, let’s dive into the step-by-step process of making Italian Herb Garlic Knots. Following these instructions closely will ensure that your knots turn out perfectly every time.
Preparing the Dough
The first step to crafting your Italian Herb Garlic Knots is accurately measuring your ingredients. Precise measurements are crucial for achieving consistent results, especially when baking. Start by gathering all your ingredients and measuring them out before you begin mixing.
Next, combine the dry ingredients in a large mixing bowl. This includes the all-purpose flour, instant yeast, sugar, and salt. Mixing the dry ingredients thoroughly ensures that the yeast and salt are evenly distributed throughout the flour, promoting consistent fermentation and flavor development.
Adding Wet Ingredients
Once your dry ingredients are well combined, it’s time to introduce the wet ingredients. Pour in the warm water and add the olive oil. Using a wooden spoon or spatula, mix the ingredients together until they form a shaggy dough. The dough should be slightly sticky and not overly wet. If it feels too dry, you can add a tiny bit more warm water, but be careful not to overdo it.
Achieving the ideal shaggy dough consistency is important, as this indicates that the flour has absorbed enough moisture and the ingredients are ready to be kneaded.
Kneading the Dough
Kneading is a crucial step in bread-making that develops gluten, creating a strong structure for your garlic knots. Transfer the shaggy dough onto a lightly floured surface and begin to knead it by folding it over itself and pushing it down with the heel of your hand. Rotate the dough a quarter turn after each fold to ensure even kneading.
Kneading should take about 5 to 7 minutes, during which the dough should become smooth and elastic. You’ll know your dough is ready when it springs back slightly after being poked with your finger and feels soft to the touch.
The First Rise
After kneading, place the dough in a lightly greased bowl, turning it to coat all sides with oil. Cover the bowl with a clean kitchen towel or plastic wrap to keep the moisture in. The dough needs to rise in a warm environment until it has doubled in size. This typically takes about 1 to 2 hours, depending on the room temperature.
To create an optimal rising environment, you can place the bowl in a warm, draft-free area of your kitchen, or even turn on your oven to the lowest setting for a few minutes, then turn it off and place the dough inside (make sure it’s not too hot!).
Visual cues to look for when determining if your dough has risen properly include a noticeable increase in size and a soft, puffy texture. When you gently poke the dough, it should hold an indentation without collapsing.
Shaping the Knots
Once the dough has risen to perfection, it’s time to shape your garlic knots. Start by gently punching down the dough to release any air bubbles. Then, transfer it to a lightly floured surface and divide it into equal pieces—about 10 to 12 pieces for medium-sized knots.
Roll each piece into a long rope, approximately 6 to 8 inches in length. To create the knot shape, take each rope and form a loop, crossing the ends over each other. Tuck the end of the dough underneath to secure the knot and place it on a baking sheet lined with parchment paper. Repeat this process until all the dough is shaped into knots.
Once shaped, allow the knots to rise for another 30 minutes to 1 hour, covered with a towel. This second rise will help them become even fluffier and lighter once baked.
With the knots now ready for baking, you’re well on your way to enjoying a batch of homemade Italian Herb Garlic Knots. In the next part of the article, we will dive into the final preparation steps, including the garlic herb butter and the baking process that will transform your raw knots into golden, aromatic bites of heaven. Stay tuned for the delicious conclusion to this culinary journey!

Techniques for Dividing and Shaping the Dough into Knots
Once your Italian herb garlic dough has risen to perfection, it’s time to shape those delightful knots. Start by lightly flouring your work surface to prevent sticking. Gently punch down the dough to release any air bubbles. Then, divide the dough into equal portions, about 12 to 16 pieces, depending on how large you want your knots.
To achieve even sizes, you can use a kitchen scale to weigh each piece, ensuring uniformity, which allows for consistent baking. After portioning, take one piece of dough and roll it into a long, thin rope (about 8-10 inches long). To shape the knot, create a loop with one end of the rope and pull the other end through the loop, then tuck the ends under the knot to secure it. Place each knot on a lined baking sheet, ensuring there’s enough space between them for their second rise.
The Second Rise
Allowing your knots to rise a second time is crucial for achieving that light and airy texture you desire. Cover the shaped knots with a clean kitchen towel or plastic wrap to prevent them from drying out. Let them rise for about 30 minutes in a warm, draft-free area. This second rise will give the knots their final puff and make them irresistibly fluffy when baked.
Preheating the Oven
While your knots are rising, preheat your oven to 375°F (190°C). Preheating is essential as it ensures that the knots start baking immediately once they are placed in the oven, resulting in a perfectly baked exterior and soft interior. This step cannot be overlooked; an evenly heated oven is key to achieving that golden-brown crust and fluffy texture.
Making Garlic Herb Butter
While your oven heats up, it’s time to prepare the garlic herb butter that will elevate your garlic knots to the next level. In a small saucepan over low heat, melt ½ cup of unsalted butter. Once melted, add 3-4 cloves of minced garlic and sauté for about 1-2 minutes until fragrant but not browned. Remove from heat and stir in 1 tablespoon of chopped fresh parsley, 1 teaspoon of dried oregano, and a pinch of salt. This garlic herb butter will be brushed onto the knots right after they come out of the oven, infusing them with rich flavor.
Baking the Knots
Once the knots have completed their second rise and the oven is preheated, it’s time to bake. Carefully place the baking sheet in the oven and bake for approximately 15-20 minutes or until the knots are golden brown. Keep a close eye on them towards the end of the baking time, as oven temperatures can vary. You want your knots to be perfectly browned but not overcooked, resulting in a delightful combination of crispy exterior and soft, fluffy interior.
Finishing Touches
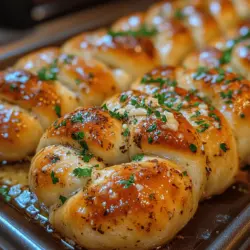
As soon as your garlic knots are out of the oven, brush them generously with the garlic herb butter you prepared earlier. This not only adds incredible flavor but also gives the knots a glossy finish. The warmth from the knots will help the butter melt, allowing it to seep into every crevice. For an extra touch, you can sprinkle some flaky sea salt on top for added flavor and texture.
Garnishing and Serving Suggestions
To elevate the presentation, consider garnishing your garlic knots with additional chopped fresh parsley and a sprinkle of freshly grated Parmesan cheese. The vibrant green of the parsley against the golden-brown knots creates an appealing visual contrast, while the Parmesan adds a savory, umami flavor that complements the garlic beautifully. Serve your garlic knots warm as an appetizer, side dish, or even as a snack on their own.
Nutritional Information
Homemade garlic knots offer a comforting treat that can fit into a balanced diet. Each serving, which typically consists of two knots, contains approximately 200 calories, 10 grams of fat, 25 grams of carbohydrates, and 4 grams of protein. They can be a delightful addition to your meal but be mindful of portion sizes, especially if you’re watching your caloric intake. The use of fresh herbs and garlic provides health benefits, including antioxidants and anti-inflammatory properties.
Pairing Suggestions
Garlic knots are incredibly versatile and can be paired with a variety of dishes and beverages. They complement classic Italian meals like spaghetti and marinara, lasagna, or even a fresh Caprese salad. For a complete dining experience, consider serving them alongside a crisp green salad or a hearty minestrone soup. When it comes to beverages, a chilled glass of Italian red wine, such as Chianti or Sangiovese, pairs wonderfully, enhancing the flavors of the garlic knots and accompanying dishes.
Culinary Variations
Feel free to get creative with your garlic knots! You can customize the recipe by incorporating different herbs, such as basil, thyme, or rosemary, for a unique flavor profile. If you’re a cheese lover, try adding shredded mozzarella or provolone into the knots before shaping them for a gooey surprise. For a fun twist, consider filling the knots with garlic cream cheese or sautéed spinach and feta for an Italian-inspired stuffed version. The possibilities are endless, and experimenting with various flavors will keep your garlic knot game exciting.
Conclusion
Making homemade Italian Herb Garlic Knots is not just about baking; it’s a joyful experience that brings the warmth of Italian cuisine into your kitchen. Every step, from kneading the dough to the final golden-brown bake, is an opportunity to express your creativity and share delicious food with loved ones. Whether you stick to the classic recipe or venture into culinary variations, these garlic knots are sure to become a favorite in your household. We encourage you to embrace the process, experiment with flavors, and create lasting memories around the dinner table. Baking is not just a task; it’s a rewarding journey that connects us to our culinary roots and to each other. Enjoy the process and the delightful results that come from your kitchen!